Showing posts with label beach. Show all posts

Sunday, May 4, 2014

Just Finished

Ballet on the Beach, 24 x 24, acrylic and collage
Elizabeth W. Seaver
Sold

Who says swimwear is required at the beach? Katerina dances to the beat of a different drummer.

Ah, sand, warm breezes and cool ocean. It's hard not to feel we deserve it after such a tough winter, right?

Blessings and happy creating to you all.

Saturday, April 19, 2014

Using Protection

Using Protection, 22 x 28, acrylic and collage
Elizabeth W. Seaver


Sunday, April 13, 2014

Distracted

Distracted, 22 x 28, acrylic/collage
Elizabeth W. Seaver

Personal electronic devices. 
 
It's pretty bad if a cool customer isn't even tempted by the birds on the beach....

Monday, January 7, 2013

Gerald

Gerald, on a Busman's Holiday
collage/acrylic, 6 x 6
Elizabeth W. Seaver

It seems silly for Gerald to spend his day off fishing from a rock when he supports his family diving for fish six days a week. But all week long he flies over people casting their lines into the water, pulling out fat fish. At first, they stand still for a very long time, then with no warning, go into action--sort of like watching golf or baseball. After an epic struggle, a fish emerges from the water. He loves to watch the successful warrior do his/her victory dance. 
His wife, Georgiana, knew he wanted fishing gear and had gotten it for him last Christmas. Oh, you didn't know gulls celebrated Christmas? Where did you think all those trees on the beach came from?

Sunday, November 30, 2008

Last Step, Reduction Block Print


Heat Wave 1/10 Elizabeth W. Seaver


And, we've made it to the final step of the printing process of the piece I have decided to call Heat Wave. The last color to print in a reduction print is always the darkest one. In this piece, I chose a deep, wine color which will become the shadows cast by the legs, umbrella and its spokes as they bake in the hot sun.

But first, to save the lighter red of the back four sections of the umbrella and the spokes of the front 3 sections the umbrella, I must cut away those shapes. If I didn't cut them away before I printed, the wine color would cover them. So under the shadow, the deepest red covers the sandy color, the yellow and the bright red.

Now, all that's left to do is title it. number it in its series, sign and date it.


Saturday, November 29, 2008

Reduction Block Print Demo, Step 6


The block in step 5 shows legs, feet and three sections of umbrella carved away. Now it is time to print in the next color, a deep red. Since I want the sand to stay "sandy-colored," I cut away all of the area around the umbrella, up to the edge of the block before printing. Above, see the print after that inking.

Tomorrow, the print series is finished.

Friday, November 28, 2008

Reduction Block, Step 3, 4 and 5


To recap, I finalized my drawing for my print in my sketchbook, and then, I traced it onto tracing paper.

Now, I take my block, which I have cut to the size of my drawing (or I make my drawing the size of the available block--did I mention I often like to use a soft block rather than linoleum which is much easier to cut and carve?) and turn the tracing paper graphite-side- down on top of the block.


To transfer the drawing, I color the back with pencil. When I lift the tracing paper, I should see an exact image of my drawing in reverse on the block.
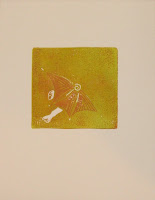


Here is the print after two stages of cutting on the block. First, I removed the top layer of the block in all the places I wanted to remain white in my final print (or the color of the paper) and then printed with my first color, which was supposed to be "sand colored."

What follows is not the clean and simple step by step I had planned on, but is an example of problem solving that happens often in the creative process. That first color turned out to be browner and darker than I wanted. I compounded my color problem by cutting the three sections of my beach umbrella before I meant to.

So, to help resolve these issues, I printed over the darker brown with a yellow ink to lighten the sand and left the darker color to become the light side of my umbrella. Looking at the result, I changed the whole idea of the colors I was going to use in this image.


The block now looks like this after two stages of cutting.

More next time.

Tuesday, November 25, 2008

Reduction Block Printing


I needed an idea for a new work, and soon. As I often do when I am searching for the next thing to work on, I flipped through my sketchbook. Now, I won't say I draw in my book every day or even every month, but I do get faithful with it every so often. As I turned pages, it fell open to the place where I had scribbled this idea several months ago for feet and/or legs sticking out from under a beach umbrella.


My scribblings reminded me that I had wanted to explore this idea, and I decided right then to do a reduction block print. I got out my tracing paper to refine the sketch that would be transfered to the actual block. I used my favorite umbrella from the three I had sketched, and then worked on legs, feet and shadows. I have discovered about myself that I love to work small, sometimes, very small. What you see to the right is the drawing when I was through making adjustments, ready to be transfered to the 3 x 3 block I had cut.


Now, you are probably wondering, "What is a 'reduction block print' when it's at home?" Here's the best way I know how to explain it to you, and then I'll quit to talk more about it in my next post: A reduction block creates a print using two or three or four, or more colors. The process is called "reduction" because each time you print a new color, you "reduce" or cut away more of the block first.