Sunday, November 30, 2008

Last Step, Reduction Block Print


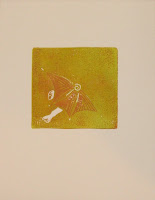
Heat Wave 1/10 Elizabeth W. Seaver


And, we've made it to the final step of the printing process of the piece I have decided to call Heat Wave. The last color to print in a reduction print is always the darkest one. In this piece, I chose a deep, wine color which will become the shadows cast by the legs, umbrella and its spokes as they bake in the hot sun.

But first, to save the lighter red of the back four sections of the umbrella and the spokes of the front 3 sections the umbrella, I must cut away those shapes. If I didn't cut them away before I printed, the wine color would cover them. So under the shadow, the deepest red covers the sandy color, the yellow and the bright red.

Now, all that's left to do is title it. number it in its series, sign and date it.


Saturday, November 29, 2008

Reduction Block Print Demo, Step 6


The block in step 5 shows legs, feet and three sections of umbrella carved away. Now it is time to print in the next color, a deep red. Since I want the sand to stay "sandy-colored," I cut away all of the area around the umbrella, up to the edge of the block before printing. Above, see the print after that inking.

Tomorrow, the print series is finished.

Friday, November 28, 2008

Reduction Block, Step 3, 4 and 5


To recap, I finalized my drawing for my print in my sketchbook, and then, I traced it onto tracing paper.

Now, I take my block, which I have cut to the size of my drawing (or I make my drawing the size of the available block--did I mention I often like to use a soft block rather than linoleum which is much easier to cut and carve?) and turn the tracing paper graphite-side- down on top of the block.


To transfer the drawing, I color the back with pencil. When I lift the tracing paper, I should see an exact image of my drawing in reverse on the block.


Here is the print after two stages of cutting on the block. First, I removed the top layer of the block in all the places I wanted to remain white in my final print (or the color of the paper) and then printed with my first color, which was supposed to be "sand colored."

What follows is not the clean and simple step by step I had planned on, but is an example of problem solving that happens often in the creative process. That first color turned out to be browner and darker than I wanted. I compounded my color problem by cutting the three sections of my beach umbrella before I meant to.

So, to help resolve these issues, I printed over the darker brown with a yellow ink to lighten the sand and left the darker color to become the light side of my umbrella. Looking at the result, I changed the whole idea of the colors I was going to use in this image.


The block now looks like this after two stages of cutting.

More next time.

Thursday, November 27, 2008

Giving Thanks, a personal note

You know the old saying, "Behind every successful man is a good woman." Well, I'm here to tell you that I would not be so happily employed as a working artist today, if it were not for my husband, Tres. He has encouraged me to step out to take financial and personal risks, lifted my spirits when I was discouraged, been my webmaster and internet guru, and urged me to "go for it," when many partners would have said "you can't do that."

On top of all that, he made my coffee this morning, AND he is cooking our Thanksgiving dinner. Yes, I am a lucky woman, and I give thanks for the man who has been my friend and my support as I reached out for a long-held dream.

Wednesday, November 26, 2008

Sketchbook Project

I was trolling blogs and websites from etsy.com and found a couple of cool things. One was the blog of Michelle Moode ( see my Favorite Sites). Then she had a link for the Art House Co-op in Atlanta (also in my Favorite Sites).

They have a project going now where you email them for a sketchbook, and you fill it with "everyone we know," the theme for a touring exhibit which will go to galleries and museums around the country. Check it out.

Tuesday, November 25, 2008

Reduction Block Printing


I needed an idea for a new work, and soon. As I often do when I am searching for the next thing to work on, I flipped through my sketchbook. Now, I won't say I draw in my book every day or even every month, but I do get faithful with it every so often. As I turned pages, it fell open to the place where I had scribbled this idea several months ago for feet and/or legs sticking out from under a beach umbrella.


My scribblings reminded me that I had wanted to explore this idea, and I decided right then to do a reduction block print. I got out my tracing paper to refine the sketch that would be transfered to the actual block. I used my favorite umbrella from the three I had sketched, and then worked on legs, feet and shadows. I have discovered about myself that I love to work small, sometimes, very small. What you see to the right is the drawing when I was through making adjustments, ready to be transfered to the 3 x 3 block I had cut.


Now, you are probably wondering, "What is a 'reduction block print' when it's at home?" Here's the best way I know how to explain it to you, and then I'll quit to talk more about it in my next post: A reduction block creates a print using two or three or four, or more colors. The process is called "reduction" because each time you print a new color, you "reduce" or cut away more of the block first.

Sunday, November 23, 2008

Fredericksburg


More slate painting today and cozy conversations with other artists as I painted. Betsy, Carrol, Megan, Kerry, Lynette, Gabe, Lisa and Stephanie, not to mention Aline and Jeff...supportive, funny, creative, cool folks!

While we chatted, I finished working on a plaque about Fredericksburg, above, using my creative license with its skyline. I love steeples, and Fred has quite a few really wonderful ones. Somehow, in my paintings, they never stay where the builders put them, nor do they usually look as the architects designed them. They are themselves and mine, all at the same time.

I also got my Etsy.com site up today, a real achievement. I am just ten days beyond my goal for getting it online, but it is done! Check it out www.elizabethseaver.etsy.com.

Friday, November 21, 2008

Beyond the Dunes


Beyond the Dunes, oil, 2008


Some days, all I can do in my studio is just show up and move stuff around. Showing up is important, even essential, to the process. But, right now, I'm in a creative phase, which energizes me. It makes me want to express gratitude for all the truly wonderful things in my life: loving family, great friends, the best job in the world and a spectacular place to do my work-- LibertyTown.

One particularly good thing happened this Fall. I entered work in an international call for entries at the Target Gallery in the Torpedo Factory in Alexandria. The show is called 5 x 5 (x 5), and all work must fit into the measure of--you guessed it--5 inches by 5 inches. Beyond the Dunes was accepted by juror Elaine Levin and will be on display at the Torpedo Factory from December 11, 2008 through January 11, 2009.

Wednesday, November 19, 2008

Blue Tree is Born, or What I did at School Today


I took four pictures in the process of painting a tree on a small piece of slate. What is not in the photos is that first the slate had to be collected from the corner of our church graveyard, washed and have its edges sanded. Then, I printed on it in white acrylic paint with a small block I made out of fun foam and mat board. Printing in white first makes the colors show up against the slate, which swamps transparent pigments. I chose my favorite pair of complements, blue and orange, as the main colors for this particular tree.


I decided to have the light coming from the right, so I added the same blue with white added in various mixtures. I mixed my orange and did the same thing on the trunk. For some reason, all the decorations run down the front of the tree like buttons on a blazer.


I added red, warm and cool yellows and a spiral as a crown to my tree.


I added spirals as snowflakes made from a soft printmaking block I cut. The rest of the tree just got made more itself with shadows and highlights. It is now ready for two coats of acrylic sealer and a pin back.

Tuesday, November 18, 2008

Scavenger Hunters

At LibertyTown today we were overrun with students who participate in Focus Art at Shirley Heim Middle School in Stafford County. They, their teachers and chaperones blew through the building in an hour, armed with scavenger hunt sheets and questions for the artists. They were curious and courteous--the perfect combination for a good time. Where is the printing press? Whose studio has guitars in it? Which potters make vases? All needed to be puzzled out in their short time here. The artists working in their studios chatted and explained about their processes and materials. The students had already been at Belmont where there is an exhibit called "Artists in their Studios," so we were a logical next stop on the tour. Thanks to everyone for a fun time, and I hope we will see them again with their friends and families.

Monday, November 17, 2008

Getting Started


As a person who is lucky enough to be able to create art every day, I thought it would be fun to get to share it with more people.

I rescued some slate from the roof of my historic church and am painting in acrylic on the pieces. Just today, I painted three tiny paintings. I will upload a photo when I get my USB port freed up.